Honda CRX Forum banner

1drivinmofo's crx project

14K views 51 replies 18 participants last post by  Vince MD  
#1 ·
So today I decide to start my project tread. It may be slow at some points because I sometimes lack motivation, but I figured I'd give it a shot anyway.
My CRX story started off when I was 18, a friend of mine just picked up an 89 dx with a zc swap after totaling his da Integra. He came by my job after I got off and asked me to go for a ride, so we jumped in his car and cruised down the high way. At this point it was the fastest car I've been in. He drove to an empty parking lot and did an e-brake turn, I thought to myself this is the most fun I have had in a car. The next day at work another one of my friends stopped by, I never noticed his car before, but he was driving a 90 si with the usual bolt-ons . At that point I knew I had to get rid of the Geo Prizm that I was driving to get one of these cars. I searched the local newspapers over the next few weeks to find one, and when I did it was a clean white 91 si. When I purchased the car I couldn't even drive a 5-speed, I would spin wheels coming out of 1st every time. The drive home with the car was one of the most memorable moments with the CRX. My friend's with the CRX's came with me to purchase the car it was awesome to ride home 3 CRX's on the highway. A few months later my CRX was totaled, when I was t-bones by and SUV. Over the next few years I drove stock Honda's and Acura's, until I purchased a 5th gen hatch. That's when the Honda bug bit; I swapped a GSR motor with every bolt-on you could think of. It had an Integra dash swap, Momo seats and so much more...
Image
Image
Image

About two years after owning the car the motor blew and I parted it out. After that I went to an EK hatch with a d16Y8 swap and type-r exterior parts. While driving this car I still had the shell of the EG, which I traded for a CRX with a D16z6 swap. The CRX sat in a garage for about a year while I drove the EK, until the day I was rear ended by an old lady. That's when I figured it's time to break out the CRX, since it was an 88 I could get historic tags (no emissions, no inspection). I drove this car for the summer and picked up and accord for a daily.

Image
Image
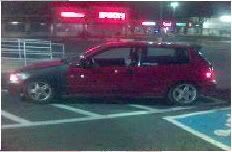
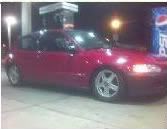
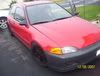
this is what the car pretty much looked like when I got it…. (No exhaust and steel wheels)
So the 1st thing I did to the car was put an RS*R exhaust on it. The open headers and the fumes gave me a headache.
Image

Next I added Omni power adjustable coil-over's and Rays engineering wheels, that I still had from the EG hatch…..
Image

I also added an EM racing rear strut bar, c-pillar bar and the triangulated bar that ties them all together
Image

(picture taken while removing the sound deadening)

Next I installed some carbon fiber mirrors that I picked up at the junk yard for $20. The clear on the carbon fiber was chipping away so I sanded them and sprayed some primer on them…
Image
 
Discussion starter · #48 ·
ungcobob said:
Dude i love your taste in your build, almost the same things im doing
Thanks a lot man, you have some nice stuff in your build also, love the roof rack!

optiquest242 said:
Cool man, good work! I like the sunroof replacement, but don't you worry about the ease of entry to the car for a thief? Thats the first thing that comes to my mind.
I'm not that worried about someone removing the panel because on the nuts I used Loctite and on top of that I have acorn nuts that are epoxy on. If you try to turn the screw from the outside it doesn't even spin.
 
Discussion starter · #44 ·
b18CRX Si said:
sweet build, love the sun roof mod
Thanks.... if you need help making the roof plug let me know

AJHS2011 said:
Nice project! Keep at it! :)
Thanks, its coming along slowly but surely.
 
Discussion starter · #41 ·
Filled the antenna hole, now just have to fill with bondo and sand….
Image

Also cut a hole in the firewall for the engine harness to come in to the cabin….
Image
 
Discussion starter · #40 ·
This weekend I had some time to work on the car, so I decided to get rid of the rusty sunroof, since I never use it anyway. First thing I did was remove the sunroof assemble and all the wiring from the fuse box to the motor.
Image

Next I placed a sheet of lexan on the roof and traced the shape and cut it out with a fine tooth jigsaw.
Image

After that I took some 1'' aluminum angle and cut it into 1'' pieces. Then I took some self tapping screws and mounted them around the edge of the sunroof about every 4''. I used to small piece of lexan to make sure the final product would not stick up passed the roof line.
Image

Image

Once you have all the brackets mounted it's time to sit the lexan plug onto the brackets
Image

Then us a drill bit to drill a hole for each bracket and then use a countersink bit on the hole so the bolts will sit flush.
Image

Once everything is tightened down, use some rtv silicon to make a gasket around the edge and you're done…
Image

Image

Image

The lexan that I purchased was already pretinted so it looks a lot better than clear.
 
Discussion starter · #39 ·
Mikesrex1990 said:
i love the glove box man that [crud] looks awesome cant wait to see the fuse box i plan on moving mine aswell over the ecu
keep up the good work!!!
thanks Mikesrex1990, this fuse box is going to be above the stock ecu location. i just need to finish cleaning up the wires and then i'll get some pictures up.
 
Discussion starter · #37 ·
Worked on the car a little is weekend in between the hurricane. I finished up the passenger side wire tuck.
Image

I purchased a 12" slim fan for the half size radiator that a picked up a few weeks ago and installed that.
I had to cut the front cross member a little bit for the lower radiator hose to clear.
Image

I also cut the t-bar a little for the fan to slide under.
Image

Nice and tight fit.
Image

I purchased a welder from harbor freight, cut a plate for the a/c firewall hole, and sealed that up.
Don't laugh it's my first time welding and the weld still has to be grinded down.
Image

I'll have pictures of how I have my fuse box set up inside the car as soon as I finish cleaning up the wiring.
 
Discussion starter · #36 ·
B53p said:
Everything looks to be coming along very well! I'm not liking the body kit to much but its not my car lol
Thanks B53P but I have always been a fan of the wings west kit. I think they look good if they are fitted properly.

Image
 
Discussion starter · #34 ·
For the last few days, I've been working on the passenger side wire tuck. I also relocated the under hood fuse box, to under the dash above the ECU. I also cleaned up a lot of the wiring under the dash. I will have pictures up soon.
 
Discussion starter · #33 ·
Can anyone help me identify this plug? It is under the throttle body and comes off the harness just before the distributor plugs.
Image


Figured this one out....... this goes to the tps sensor
 
Discussion starter · #32 ·
I had time this past weekend to get a few things done. First I painted the tow hooks and the cross member 17mm bolts.
Image

I also bolted the cross member back on the car, I did not install the radius rods yet because I need to clean up the control arms.
Image

Installed a community sticker (that was hard work lol)
Image

I received my bolt boy's engine bay bolt kit
Image

Worked on the driver side wire tuck
Image

Installed multi-ground and hid ballast here
Image

Installed a piece of rubber on the loom so it was not rubbing on the frame
Image

Taped up and cushion clamed
Image

Everything loomed and secured …
Image

I will be tightening up everything in this area once the lights are installed again.
Image

So just one question where are you guys tucking your resistor boxes at? I just separated the resistor box wiring from the rest of the harness and left it hanging until I figure out where to put it. I am also still running the 2 wires that go into the brake fluid reserve.
 
Discussion starter · #31 ·
sleeper17 said:
i love the glove box set up. kind of looks like something im going to do.
thanks sleeper17. I'm going to be installing a decka battery behide the dash on the exhaust tunnel and it would be a pain in the a$$ to get a hotshot if my battery died so thats the reason behide the whole glove box set-up...

i also sandblasted the tow hooks and the bolts for the front crossmember...
Image
Image
 
Discussion starter · #29 ·
I made the top bracket for my radiator yesterday and it fits very well…
On the passenger side it only leans back 1 ½" from the t-bar…
Image

On the other side it leans back less than a 1"
Image

Over all I'm happy with it because I did not have to chop up the underside of the hood, but if I did I could have gotten it to sit flush….
Image
 
Discussion starter · #28 ·
I installed my EG half size radiator yesterday, which I picked up for a steal…
1st I laid down some painters tape and traced the radiator. Then I took the angle grinder and went to town.
Image

Next I took a drill and drill some holes for the pins on the bottom of the radiator, then wiped every 20 years of dirt build up off and sprayed primer where I cut.
Image

Then painted it black….
Image

Fitted the radiator…
Image

It has a little lean but nowhere as bad as before and I didn't want to cut the hood up.
Image

I still have to make my top bracket for the radiator...
I also started to replace some of the rusty 10mm bolt with socket caps and finishing washers…
Image

Image
 
Discussion starter · #27 ·
I really did not get much done on the car this week, but I did finish up the dash.
Integra gauge cluster installed (still have to test it to make sure it's working at 100%)
Image

Also finished up the glove box
Image

Removed this bundle of wires from the dash harness
Image

I picked up a bunch of m6 bolts and clamps for the soon to be done wire tuck….
Image
 
Discussion starter · #24 ·
Since my last update i have been really sick, it sucks to have a cold in the summer time. I spent Saturday morning working on my girls EG coupe, painted the valve cover pink, welded her exhaust back together since the weld broke at the muffler and the pipe, and I also installed GSR front lower control arms with energy suspension bushings with the GSR front sway bar… later that day we went to artscape, which is a really big art event in Baltimore. One person had decorated an EF hatch, not my cup of tea but I think the bat looks cool…
Image

on Sunday I started to feel like crap again so I only finished a little on the CRX. I finished the glove box panel, just need to wire it up now.
Image


I also put some new seam sealer in the engine bay where I removed it…

Image
Image

hopefully today I can get the bay painted and start on the driver side wire tuck….
 
Discussion starter · #23 ·
So today I started working on my battery relocation project. I purchased a Deka ETX20L battery like 2 weeks ago and I did not want to put it under the hood since I plan on doing a wire tuck in the near future. I plan on relocating the battery on top of the exhaust tunnel behind the shifter console. So today I started to fabricate my new glove box set up. First I made a card board cut out of the shape of the glove box. Then I traced the card board on to lexan and cut the shape out...
Image

This is where I test fitted my lexan to make sure it fit tight…
Next I cut out the holes for the remote terminals and the volt meter. There is also a 60amp fuse behide the lexan. I'm still waiting on my battery cut off switch to get here so that can be installed next to the volt meter…
Image

Image

As soon as the rest of the stuff comes in for this project I can finish it up...