Honda CRX Forum banner

Custom CRX R134 AC system using TRS090 compressor

1 reading
92K views 117 replies 38 participants last post by  vinnanater  
#1 ·
As some of you may know, the Sanden TR70 is notoriously unreliable. I have been through about 5-6 AC jobs in the past few years on my 89 hatch due to repeated failures/issues with the TR70, all with R12. It has been an ongoing hassle with my car to have adequate AC. If any of you live in hot climates and have converted your CRX's to R134 you likely know how bad an R134 conversion sucks in these cars - especially at idle without a parallel flow condenser and the weak TR70. My brother and I have been on a mission for years now to get good AC systems in these cars. I even own a 50 pound R12 cylinder SPECIFICALLY just to maintain my EF AC system for as long as possible.

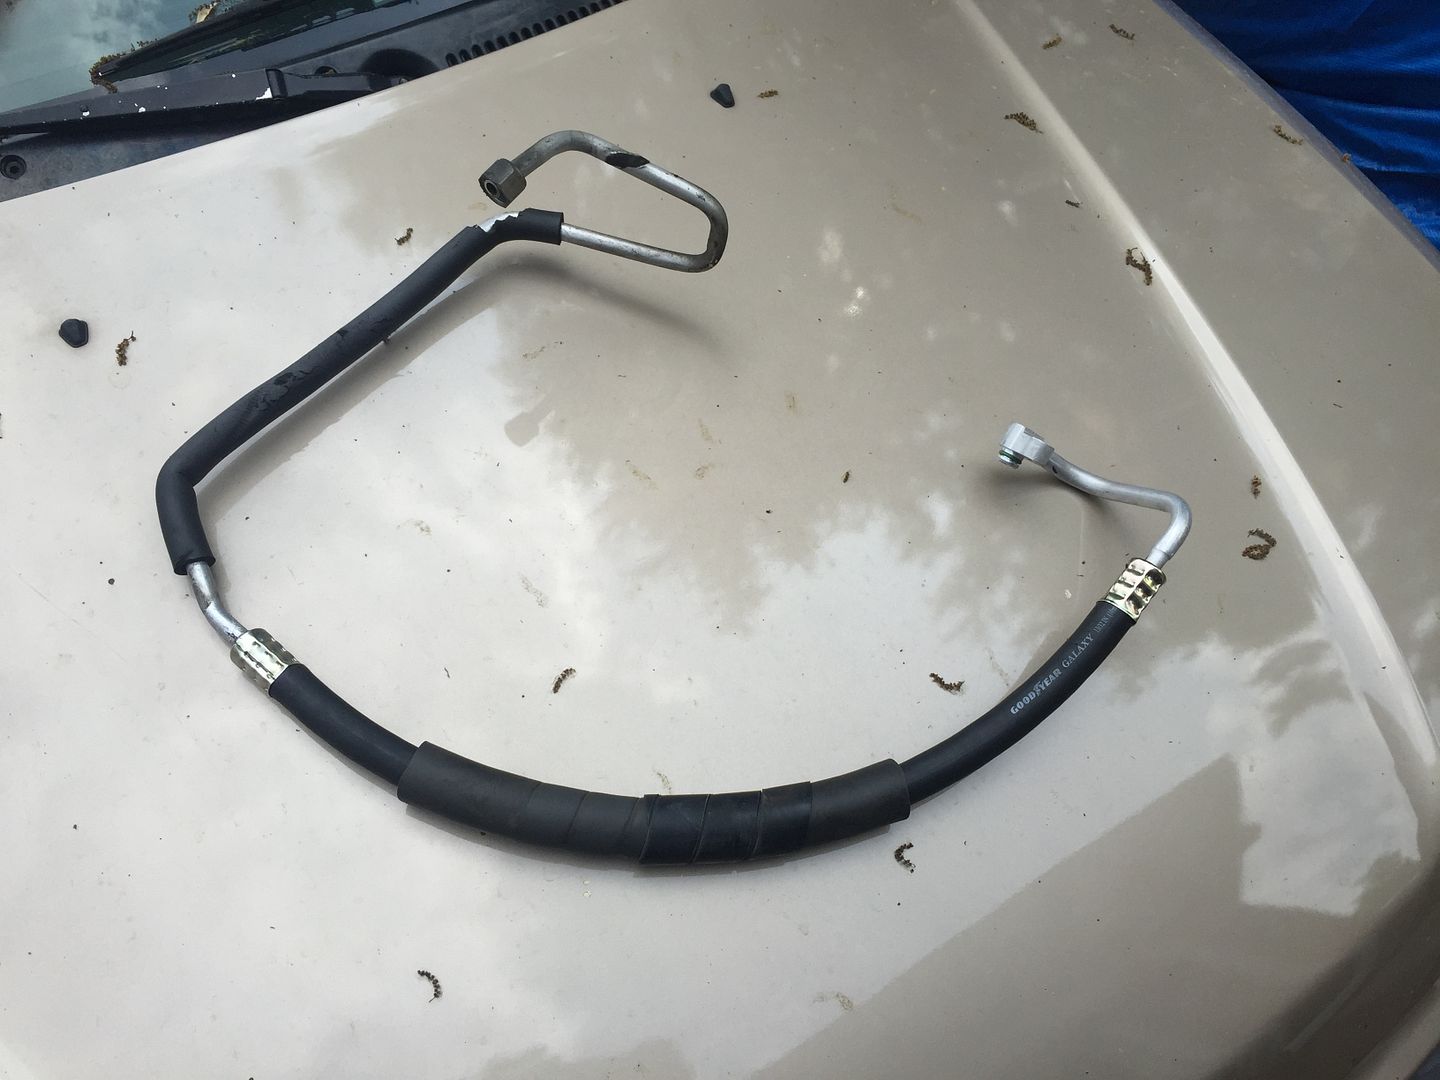
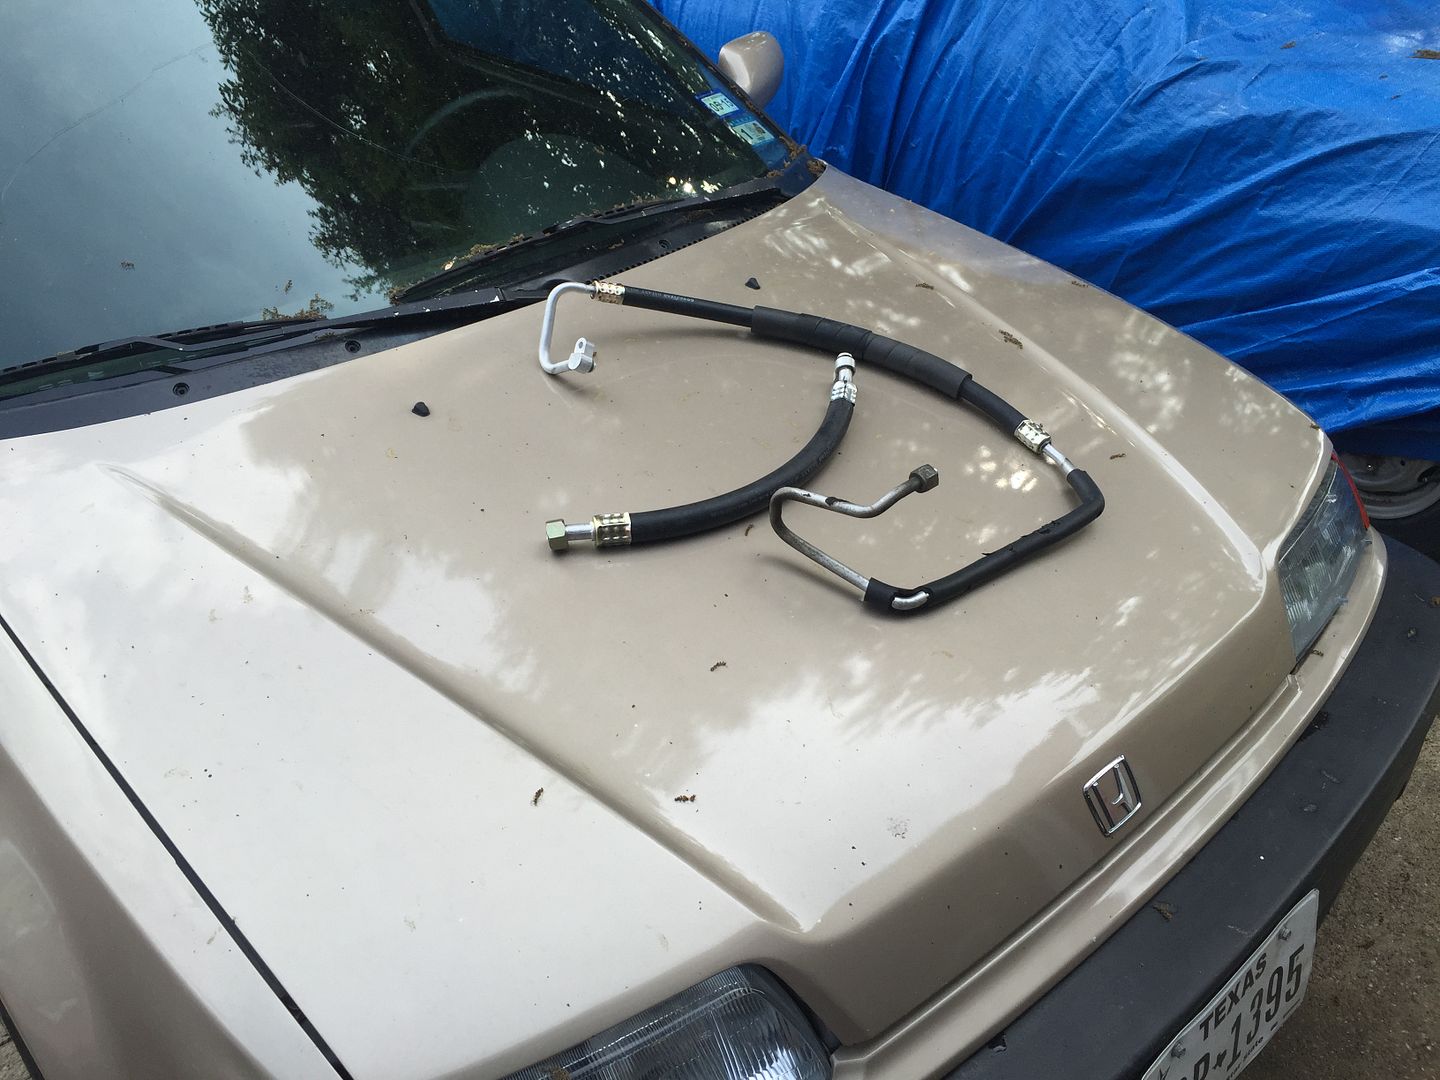
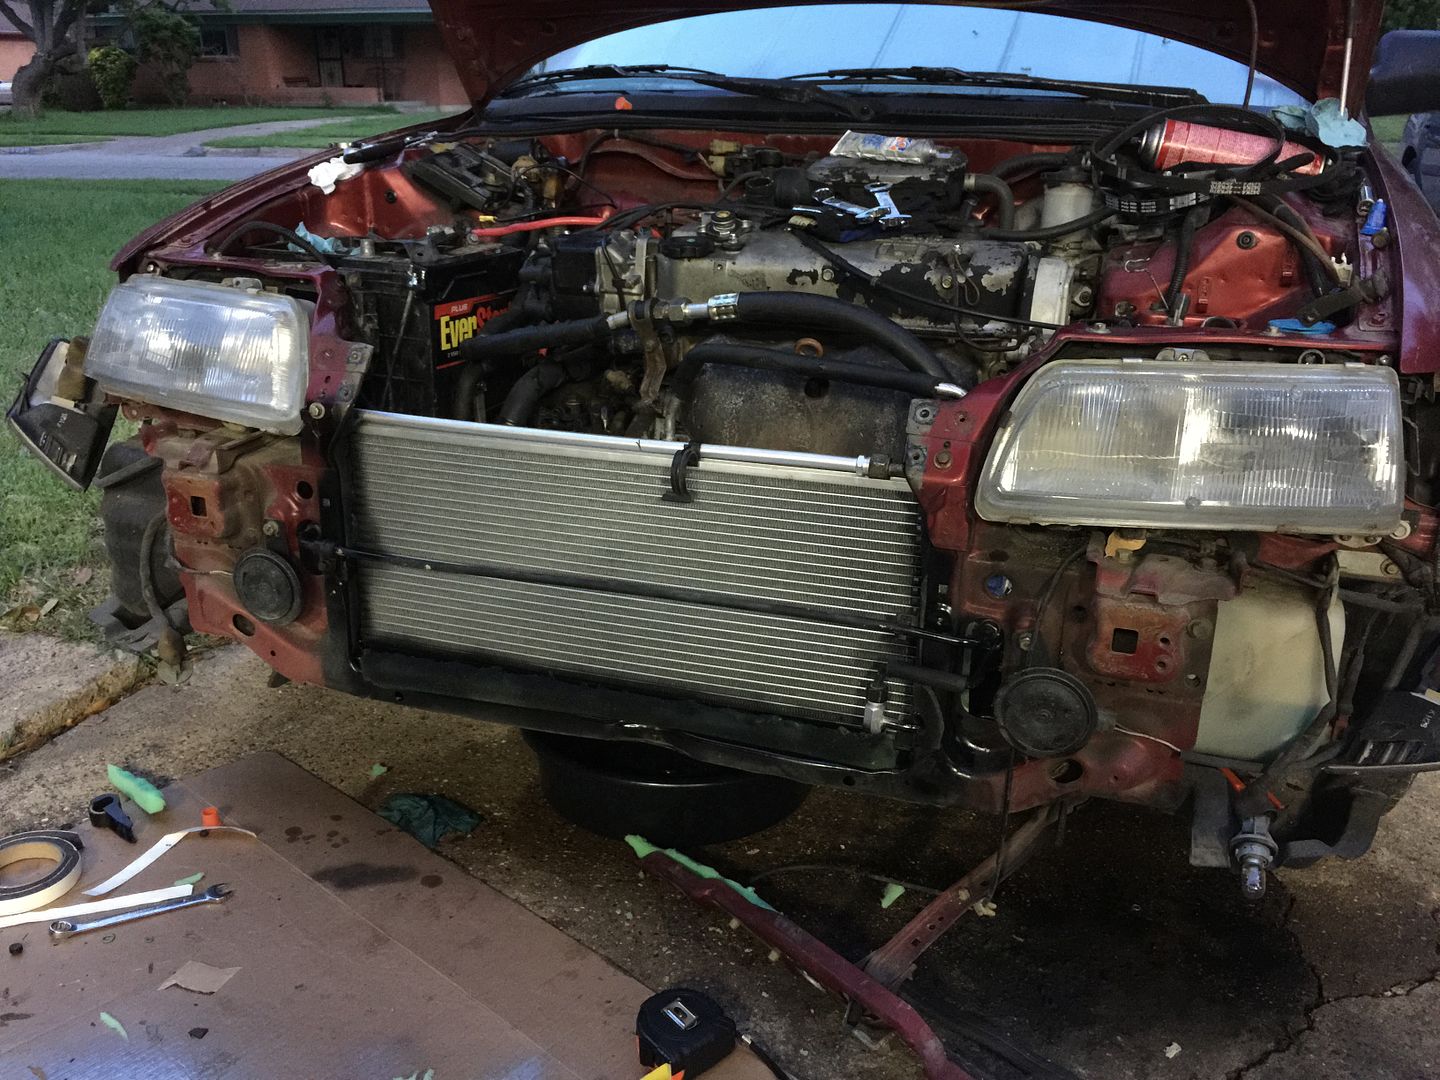
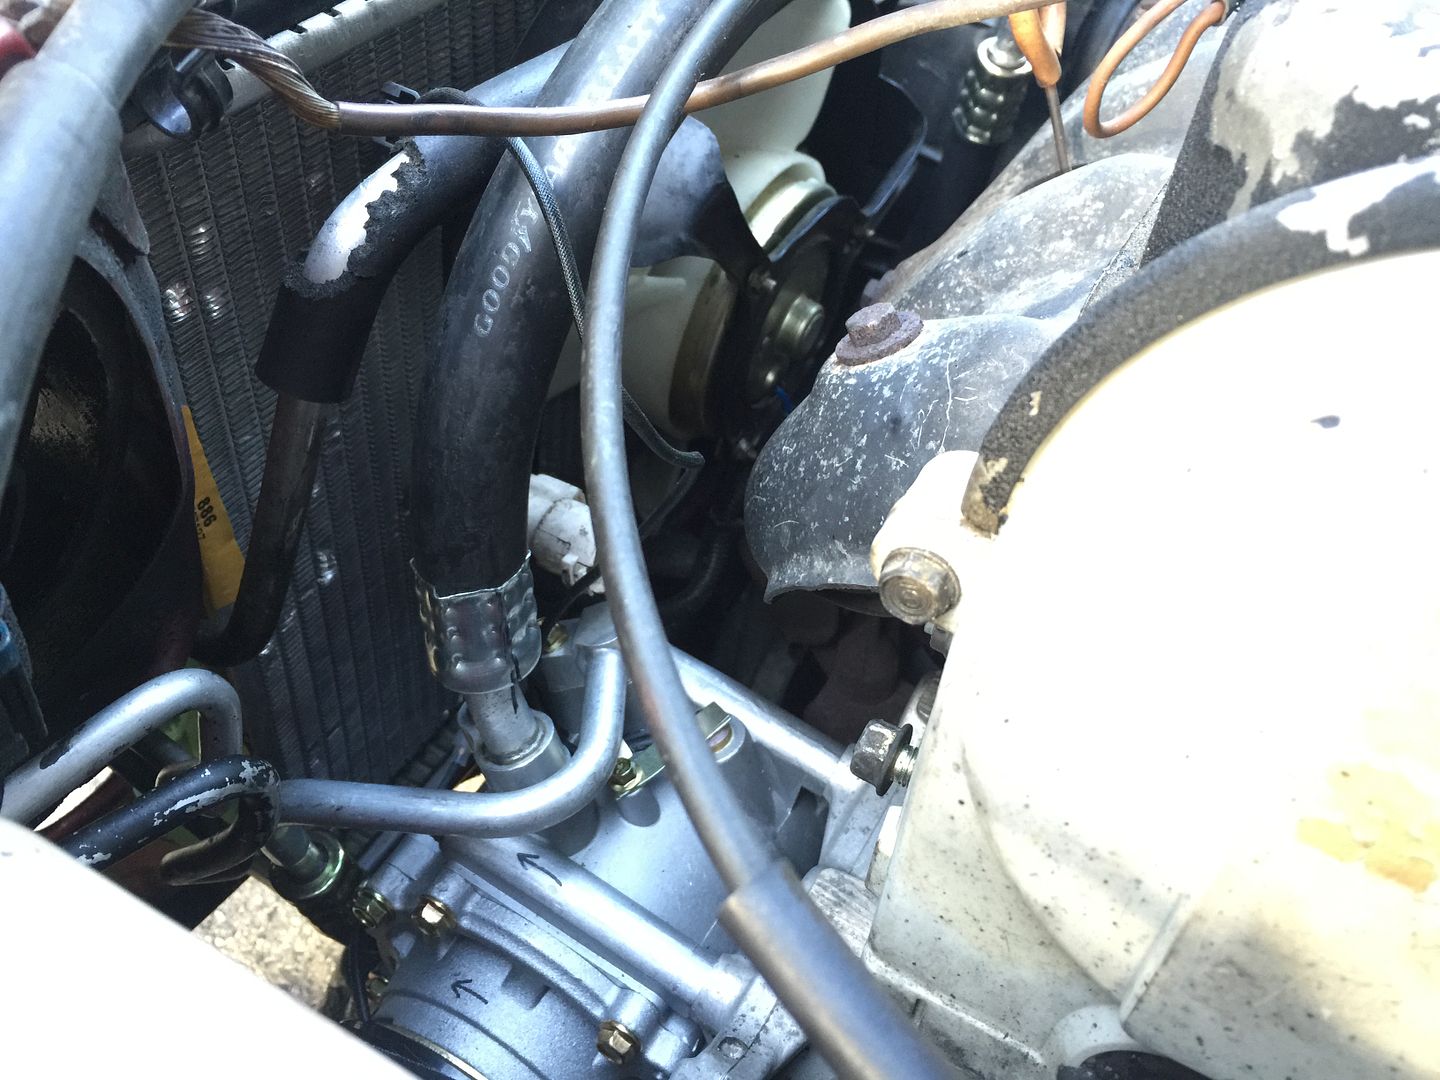
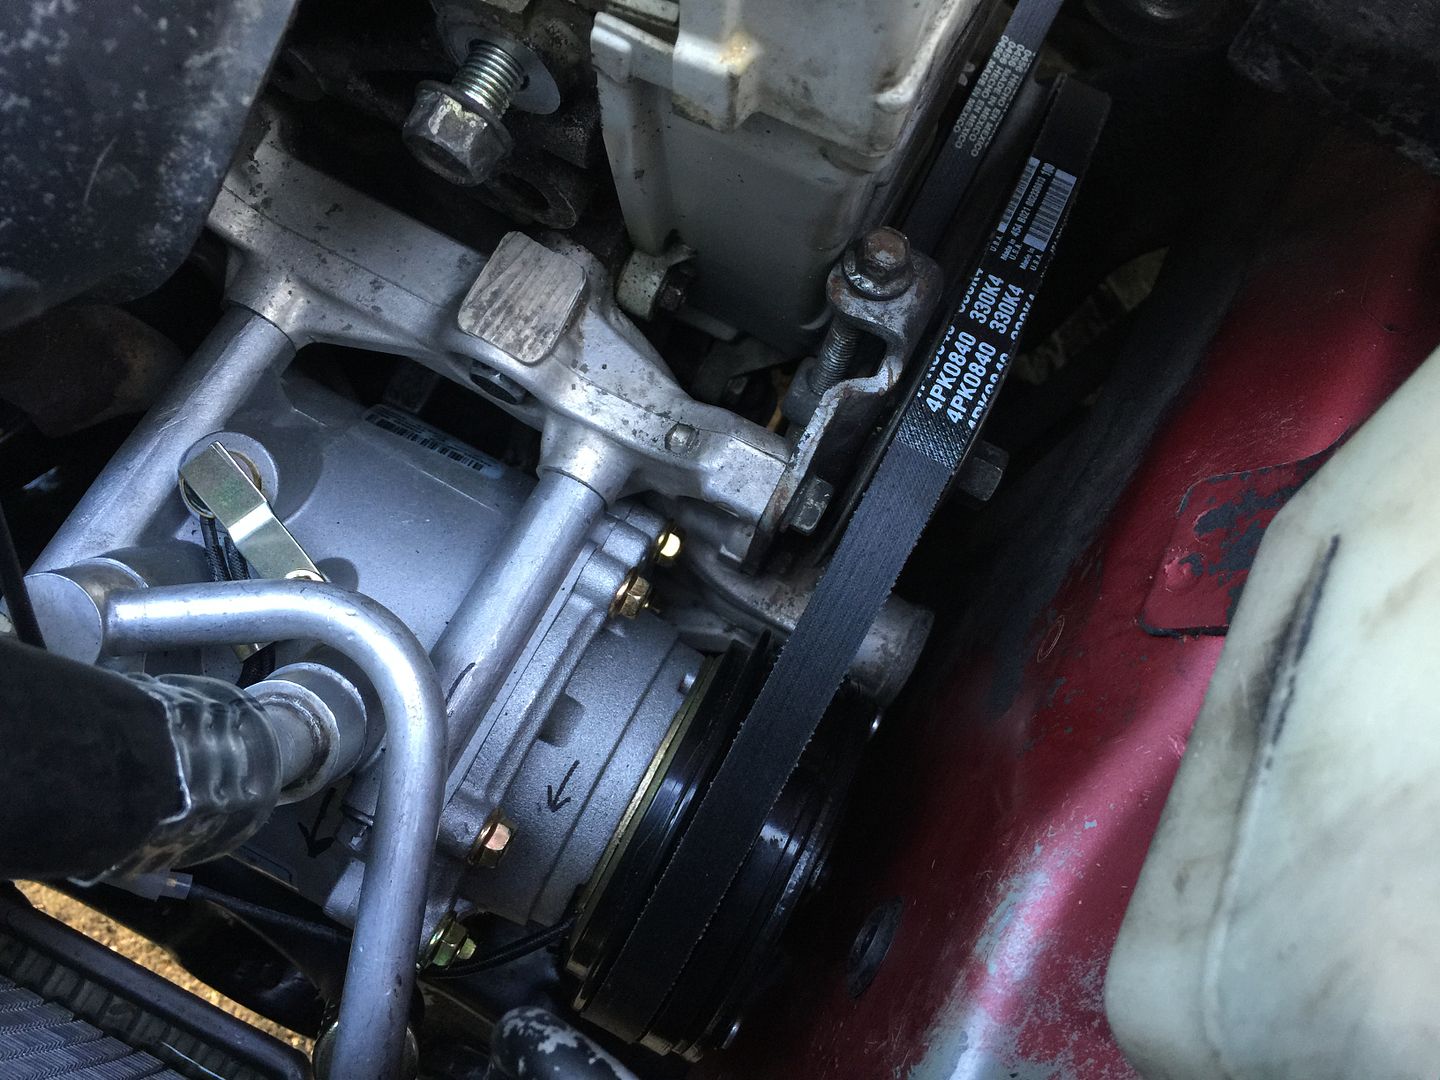
So I got this idea from user JMZ400 on H-T.com if any of you have seen that thread there. My brother and I finished this over the past two days on his CRX D15B2. His system now includes a new evaporator, new expansion valve, new drier, new parallel flow condenser, and new (aftermarket) Sanden TRS090 compressor. We made the custom AC hoses/lines ourselves using a factory EG Civic suction side compressor fitting, and the discharge side compressor fitting is from a 1997 CRV. Kudos to JMZ400 on this whole idea.

My brother's CRX was originally a Matsu****a equipped car. We used an aluminum EG VX compressor bracket (cut off the torque mount) along with a stock EF Matsu****a idler pulley. We used the factory EG compressor bracket bolts as well as factory EG compressor bolts. We suspect the stock Sanden idler pulley is identical and would also work but didn't care to test that out. The stock belt would not fit so we had to use a 32" belt.

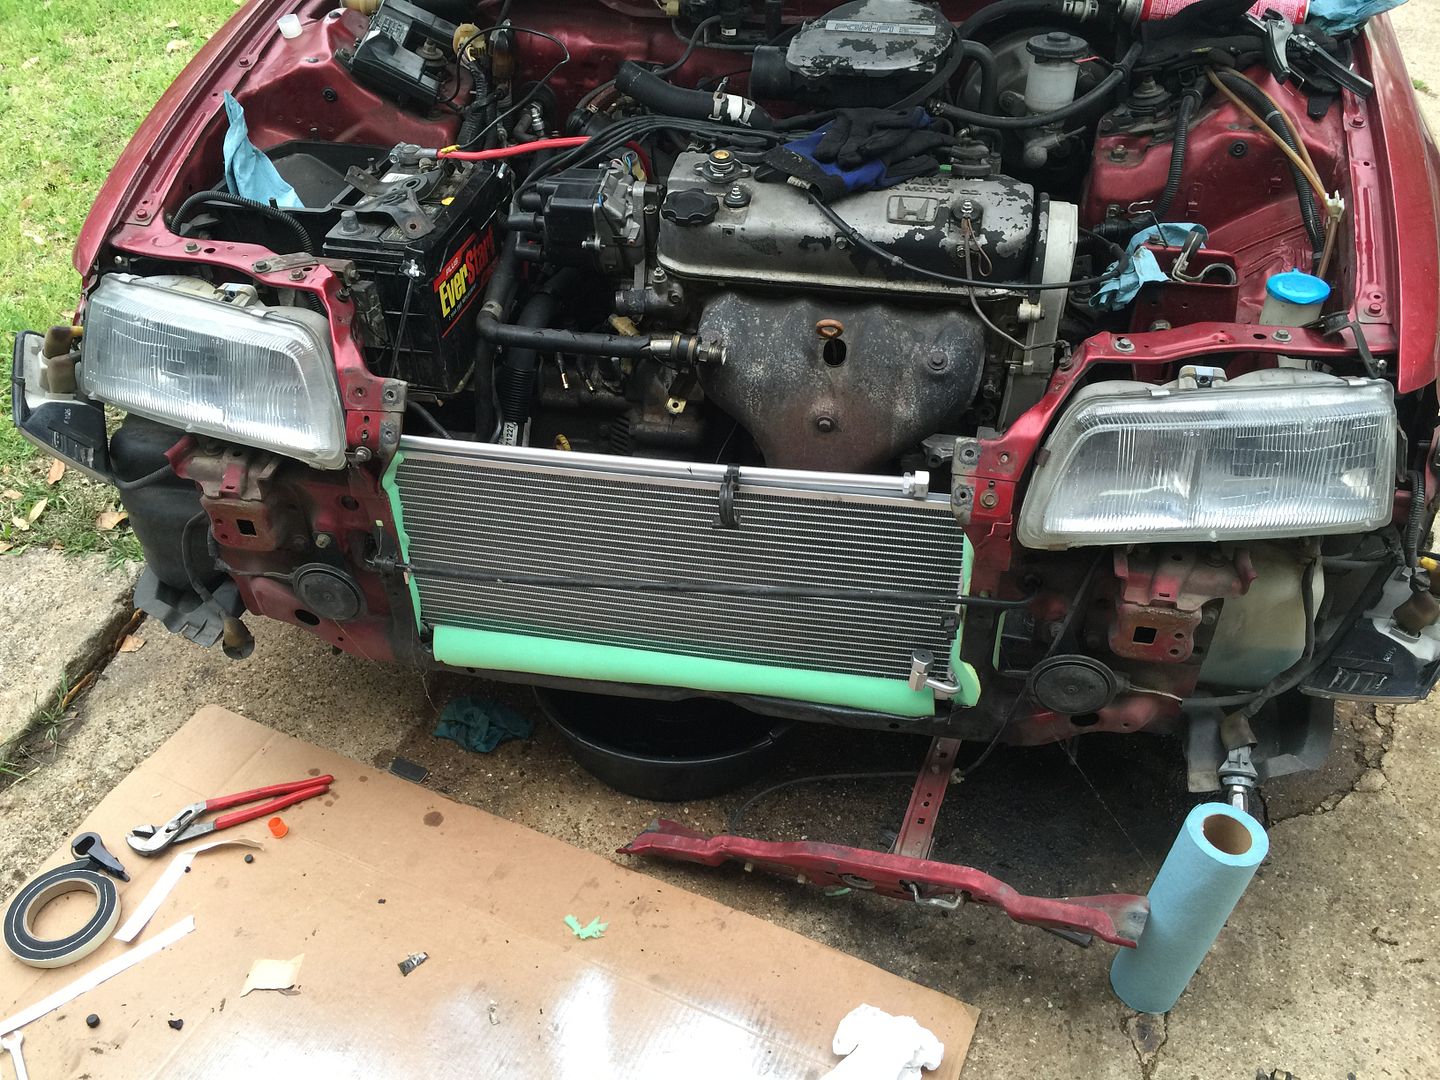
We went to a fabric store and bought some foam to really seal up around the condenser, and then painted it black because who wants green foam showing through?

Onto the pics:


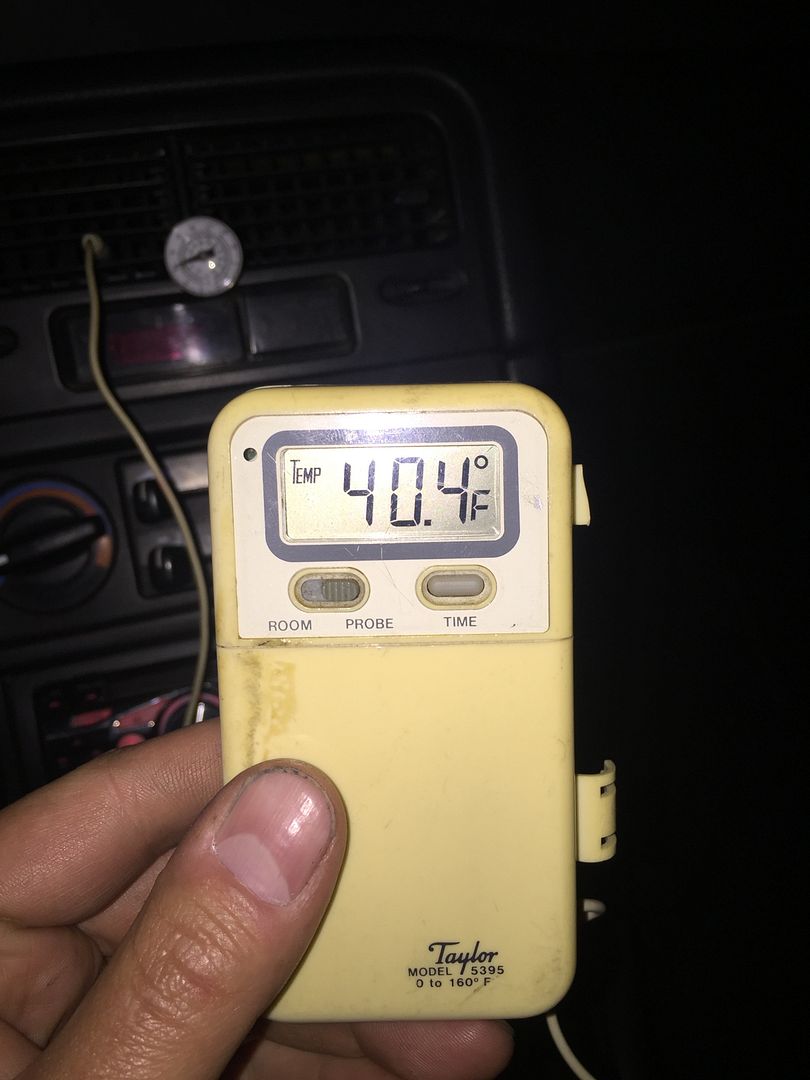
Now - it was only about 70 degrees outside when we finished his car, so we're unable to get a true how-does-it-perform-in-the-middle-of-the-summer test. However, I just re-did my entire AC system in my own EF. I stayed R12 with the notoriously unreliable Sanden TR70.

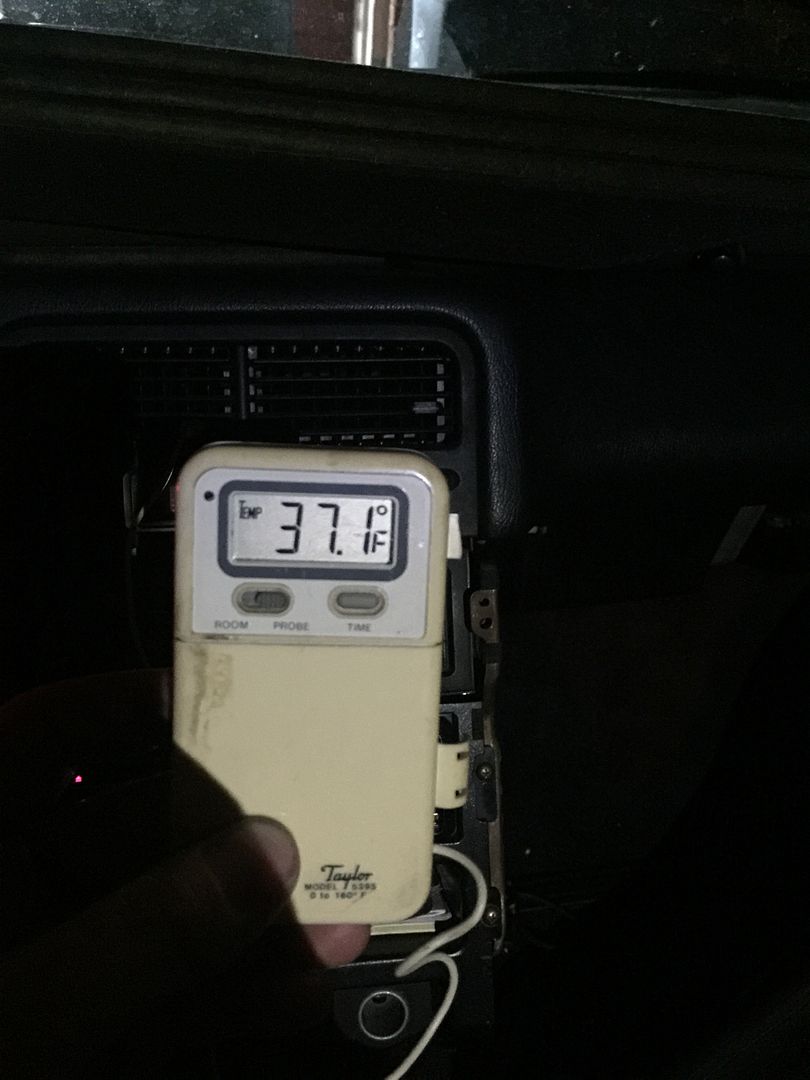
So how about this for a comparison, my new OEM spec R12 sytem, at idle:


His CRX with the JMZ400 custom system and R134, at idle:


Very promising so far. Again this is a direct factory spec R12 car directly compared to this new hybrid R134 system, literally both sitting in the same driveway at the same time. It's supposed to get into the 80's next week so I will report back with performance updates. Even if this "only" operates on par with a factory R12 system that is still an upgrade just from the simple fact of getting away from the awful TR70.
 
#27 ·
No the TRS090 and TR70 are roughly the same size

I did not source uncrimped fittings. You are correct that once crimped you cannot remove the hose.

You must cut the ferrules off and then cut the hose off, and voila you have an uncrimped compressor side fitting. This gets into the territory of why this stuff is "custom" ;)
 
#28 ·
James is the king of EF ac system info! I think I've read every single thread you've posted on numerous forums and always save all the info. Any updates on the comparison of the 2 vent temps now?

Also, how did you "make" the custom lines?
 
#29 ·
J Wid said:
James is the king of EF ac system info! I think I've read every single thread you've posted on numerous forums and always save all the info. Any updates on the comparison of the 2 vent temps now?

Also, how did you "make" the custom lines?
I don't know about the being the "king" but I have learned a lot from tons of reading on the web over the years. I must also again point out that the idea for this swap wasn't mine, JMZ400 on Honda Tech had the initial idea for the TRS090 and custom hoses (although he still hasn't totally finished his as far as I know). There are a few AC specific forums that I have learned a lot on. Plus having to re-do my own system over and over and over (and blowing lots of money in the process) in addition to having worked on the AC's of several other EF's, it has afforded me invaluable learning experiences on these cars specifically. :biggrin:

Very long story short, AC hoses are crimped onto the hard lines/fittings with metal sleeves called "ferrules". If you remove the existing ferrule, you can then cut the hose off and you are left with just the hard line/fitting. You can then use new hose, and use an AC crimper tool to crimp a new ferrule onto the hose. Doing this, you can pretty much join ANY two fittings/lines you could possibly want to join by adding new hose in between. It is of course not THAT simple as you have varying fitting/line diameters, varying AC hose sizes, an assortment of adapters, etc. but using combinations of all the above you can pretty much build any hybrid/custom hose you could ever want as well as fix just about any factory hose.

It took me a lot of research and some blown money/trial and error/testing and dealing with some very unhelpful/dismissive AC people to figure this all out but it's really very simple once you know how to do it. Not necessarily "easy" as it does take some skill to not damage your fittings, etc. but the actual steps are simple.

I'm pretty satisfied about it really, because as best I can tell it's frowned upon by dismissive AC "experts" who view this style of repair/customization as subpar and prefer to take AC lines to shops to have them braze on new fittings and/or braze/weld the hardlines together directly as opposed to this ferrule method. So it's kind of an "in your face".

And this is not to say that I have discovered some hidden secret at all regarding making custom hoses - all this info is out there in bits and pieces if you look long and hard enough and anybody can figure it out just like me. Although just my descriptions above gives anybody a much better and encouraging head start than I had. :rofl:

I don't have any direct side by side vent temp comparisons but I can say that my brother's CRX with this swap is still performing great. It's hard for us to get a situation in which we are both free and together and can let both cars sit in the same spot for a long time and then start them both up and take an identical test drive/route to compare. I'm confident the two systems pretty much are always within a couple degrees of eachother.
 
#30 ·
Very nice, thanks for the info. Would you be willing to make some more of these lines for a fellow Texan? I do have my daily driven Toyota truck with AC but wanted to rebuild the AC in my wagon. Probably not this year, but at the start of 2016. So there is no rush. Let me know if you would be willing and what you would charge. I would like to try the trs090 compressor with the parallel flow in this car. My last AC setup was the tr70 in a stock hf and it was decent. My drive back and forth to work consists of highway driving and it did well, I would like to try out this new setup next.
 
#31 ·
If anybody is seriously interested, I'll make these custom AC lines for $230 shipped in the U.S.

That price includes me supplying all the fittings/necessary parts and shipping complete finished units to your door. It will require no legwork on your end as far as hunting down EG and CRV fittings or supplying a factory EF condenser side hardline.
 
#33 ·
Any info on doing this with a TRF090 Compressor (EG R12, Prelude R12&R134A). Its a R12 compressor , but I think Honda also used it for R134A applications as it comes up in parts lists for 96 prelude. It has fittings that look identical to CRX. Perhaps a TRF090 could be mated and run R134a (like a 95 96 Prelude) without having to modify lines ?

I wonder if the only major difference between a TRF090 and TRS090 is the fittings, in that case I think a TRF090 would run great on R134A.

Thoughts ?
 
#34 ·
Ive read through this twice now and have a couple questions if you dont mind

First is the galaxy barrier hose, I did a search and seen goodyear and continental have a few different part numbers for this, there is 4890, 4826, 4890, ect did you look into these or just use which ever the parts store had?

Also do you have any picture of how you cut the crimps off?
 
#35 ·
As far as the brand of barrier hose it's somewhat inconsequential. I certainly don't have any brand preference. Goodyear Galaxy is probably the most widely seen/used. But I doubt that is due to any particular affinity for Goodyear, it's just that it's what's most widely available.

Given that, I'm not sure what you mean by asking if I've looked into the different part numbers and/or brands. I didn't look into or seek out any specific part number for Galaxy barrier hose. I'm not sure offhand what your part numbers mean. One could be a standard hose vs a reduced hose or it could be a newer style hose with a different barrier material. I don't really know.

My hose crimper only crimps standard barrier hose, so the only thing I sought out was a local source for standard barrier hose because my crimper does not crimp reduced barrier hose. Most parts stores guys don't even realize there's a difference between standard and reduced.

I went through about 2-3 tries with O'Reilly's repeatedly giving me reduced barrier hose telling me it's "standard" barrier hose. In their defense, I'm sure it is exceedingly rare for people to go into parts stores seeking AC hose to do their own repairs, so the parts guys probably just have zero experience with it. I ended up determining that O'Reilly's does not and cannot get standard barrier hose anymore. Their system does not even let them order it.

You can certainly order online or eBay, but the hose is so dense/heavy that shipping really eats up the savings you get on the price per foot.

I ended up getting my hose at Napa. I couldn't find standard barrier hose anywhere else locally. Reduced barrier hose is widely carried just about everywhere it seems. I think standard barrier hose may not be in production any longer and/or may be close to not being in production. But one isn't "better" than the other in terms of performance other than the reduced barrier hose gives you more options if you're working with a very tight area and need to make some sharp bends etc. Most newly manufactured AC hoses are reduced barrier hose.

I don't have pictures of cutting the crimps offhand. All you do is take a cut-off wheel and cut right through it. Just don't cut all the way through the hose and damage your fitting underneath. And obviously don't damage the beadlock groove.
 
#36 ·
lovemyef said:
Any info on doing this with a TRF090 Compressor (EG R12, Prelude R12&R134A). Its a R12 compressor , but I think Honda also used it for R134A applications as it comes up in parts lists for 96 prelude. It has fittings that look identical to CRX. Perhaps a TRF090 could be mated and run R134a (like a 95 96 Prelude) without having to modify lines ?

I wonder if the only major difference between a TRF090 and TRS090 is the fittings, in that case I think a TRF090 would run great on R134A.

Thoughts ?
The fact that they both end in 090 indicates to me it's the same compressor with only differences perhaps being a different pulley and/or hose fitting differences. Or even a power wire harness connector difference. But the actual compressor itself almost assuredly would be the same compressor. So I'm not sure what advantage you would have by seeking out a TRF vs a TRS. Same thing.

As far as "R12" compressor vs "R134" compressor there is zero difference in terms of physical compressor operation/construction. Back in the early/mid 90's an "R12" vs "R134" compressor would have a tangible difference in terms of the seals/gaskets used.

However, any new construction or rebuilt compressor you get these days will be backwards compatible with R12 because it will have the newer R134 friendly gaskets/seals internally.
 
#38 ·
NovaVTEC said:
Man, you will never get released from this thread :)
But I learned something again about barrier hose! Thanx!
Reading over my response above about the hose I see I should add a clearer explanation of the tangible difference between reduced vs standard barrier hose:

Reduced barrier hose and standard barrier hose have the exact same inner diameter. For example, a #6 reduced barrier hose will be identical on the inner diameter as a #6 standard barrier hose. The difference is the OUTSIDE diameter. The reduced barrier hose has an outside diameter that is smaller than the standard barrier hose. This is why I said the reduced barrier hose is better suited for tighter bends, tight spaces, etc. And this is also why my crimper does not work on reduced barrier hose, because my dies are only sized for the larger standard barrier hose.
 
#40 ·
NovaVTEC said:
Wasn't that obvious? :)
Lol well I just figured I'd make it super obvious for anybody out there reading this or stumbling upon it in the future. Nothing more aggravating than doing a bunch of web research on a topic, finding some old thread on the interwebz somewhere, and the good info you found in the thread not quite being clear enough for you and yet the thread is long dead and dormant. :biggrin:
 
#41 ·
James89DX said:
NovaVTEC said:
Wasn't that obvious? :)
Lol well I just figured I'd make it super obvious for anybody out there reading this or stumbling upon it in the future. Nothing more aggravating than doing a bunch of web research on a topic, finding some old thread on the interwebz somewhere, and the good info you found in the thread not quite being clear enough for you and yet the thread is long dead and dormant. [emoji3]
Gotcha. Like I said this should be stickied.

Look what the cat just dragged in. A cool doc with all specs and troubleshooting:

https://www.dropbox.com/s/14ln8s42ndyyaop/2008-07-28_194107_CivicAC.pdf?dl=0
 
#42 ·
James89DX said:
As far as the brand of barrier hose it's somewhat inconsequential. I certainly don't have any brand preference. Goodyear Galaxy is probably the most widely seen/used. But I doubt that is due to any particular affinity for Goodyear, it's just that it's what's most widely available.
...
Got it, i looked into a few and just wanted to see if you noticed any were better than others, but i got my answer.

I appreciate all the replies and I'm sure others do/will too. I don't do as well as others with heat and I've been looking into custom AC for years now, spending many evenings searching but always hit dead ends, this thread has been the most helpful one by far

That being said there is just one more part I'm not clear on, and that is the crimping process. I did a quick search for the crimp tool and have a basic understanding of how it works, but do you have any pictures of the crimping process or how they look after you crimped them? I recall reading you cut the crimps off the EG hoses so you can use the fittings with your own hoses, I would find the pictures of how they look after having the hoses removed useful, I'm trying to wrap my head around the process of crimping a new hose back on after you cut the material that was crimped, does the hose come with metal on the ends that you can crimp to the new fitings?
 
#43 ·
Before crimping the ferrule looks like a straight pipe fitting over the hose outside diameter. After crimping it looks like what's on now. The tool basically looks like a giant vice. There is always Google pictures if you want to see one. You are way overthinking this!
Ferrules are bought seperately, there are dozens of different end fittings.
 
#44 ·
This is something that took me a lot of trouble to figure out/get answers. I almost hate to just spell this process out on a silver platter as again it took me forever to figure it out but oh well. You'll see it's really simple actually, so I guess I shouldn't be secretive about it - but as you have discovered, despite how simple it is it's not all that easy to figure out remotely and web resources are lacking. 8)

Here are two different styles I cut up to show a sort of cross section, this should really help you. The lower one is from an EF. See the two large ridges? That's called a beadlock groove.

The upper one is from an EG. Notice it does not have two large grooves, but rather it has a recessed groove.


Now, these two style are inherently the same thing. If you'll notice, the ferrule sleeves fit into the grooves. This is what holds the sleeves, and in turn - the hose, in place. When you cut these off, the new ferrule sleeve fits right over the whole thing. Of course, because your new ferrule sleeve needs to be able to fit over your groove, then the issue becomes how do you secure the ferrule sleeve into the groove?

You slide your ferrule sleeve over the entire groove, then use a C or E clip to pop into the groove. Slide your hose up until it rests against the C or E clip, then slide the ferrule sleeve back down onto the hose until it also bottoms out on the C or E clip. Then you crimp the new ferrule down and voila.


#45 ·
Hacking at its best. Makes you wonder why everybody thinks it's so complicated...
That crimped seems expensive...

Did you ever attempt brazing hardlines?
Also, why do you think the drier was changed with the Denso compressor?
 
#46 ·
NovaVTEC said:
Did you ever attempt brazing hardlines?
Also, why do you think the drier was changed with the Denso compressor?
I haven't messed with brazing. I was looking into it and was going to try that out before I figured out this ferrule replacement deal.

The difficulty with brazing, is that the brazing materials have a melting point very close to the melting point of your aluminum lines you'd be working with. So if you're not very careful you can end up melting your line that you're attempting to braze.

There is a product out there, called Braze Perfect, that certainly looks very easy to use. But like I said, I haven't tried it.

No clue on why the Denso has a different drier. All driers are the practically the same internally. Only differences are volume and how the lines connect. Unless the drier is substantially sized differently, or the lines physically connect in a different way, my guess would be Honda simply went with a different drier to a supplier issue, rather than a "need" for a different drier.
 
#47 ·
"So I'm not sure what advantage you would have by seeking out a TRF vs a TRS. Same thing. "

My theory was that the TRF has fittings that look identical to CRX fittings and this compressor could likely be mounted WITHOUT custom lines, maybe just a slight bend of the OEM style lines. Of course I would still want to get new lines with barrier hose if the TRF would bolt up and seal to CRX R-12 lines that would save the cost of a crimper and all that hassle of custom line building.

TRF090 on top , TR70 on bottom. fittings look spot on as far as how the o-ring seats. Im thinking instead of making custom lines the crx lines could just be bent slightly forward to accomidate the TRF090.


#48 ·
I see what you're saying now. That's a very good observation.

I just looked up the 92-93 EG Civic suction and discharge hoses. The EG 92-93 suction and discharge hoses have compressor side fittings that are the same style fittings as the EF Sanden TR70 compressor fittings. The 92-93 Civic hoses are different part numbers from the 94-95 Civic hoses.

You actually may be onto something here, the big kicker here would be the diameter(s). The TRS090 fittings are a larger diameter than the TR70. But if the TRF090 openings are indeed smaller, as it looks, then you actually may be onto something here.
 
#49 ·
And actually, now that I look back on some older threads, 94eg! actually stated back a year ago when JMZ400 was first working on this that the TRF090 would have been the way to go.

In hindsight, it certainly looks like the TRF090 would have been the first thing to try. Perhaps JMZ400 didn't want to try the TRF090 because it was an "R12" compressor and he was intent on going with R134. I would bet money that's what his reasoning was. But again the R12 vs R134 compressor difference is moot on new construction compressors.

I'm not sure if JMZ400 did or didn't try the TRF090. He did the reseach/legwork here, I just finished what he had already thought of. But I'm really now thinking the TRF090 might be the better choice and no custom work.
 
#50 ·
James89DX said:
This is something that took me a lot of trouble to figure out/get answers. I almost hate to just spell this process out on a silver platter as again it took me forever to figure it out but oh well. You'll see it's really simple actually, so I guess I shouldn't be secretive about it - but as you have discovered, despite how simple it is it's not all that easy to figure out remotely and web resources are lacking. 8)
...
That has helped so much. I feel like I owe you a drink now
 
#51 ·
Thanks for the confirmation James on the TRF. I did find an old thread on HT that mentioned it bolting up. If I didnt have the clearance issues I would try it. Now to do this on my B swap it looks like I will need not only the CRV bracket, trF090, but will also need an aftermarket front crossmember and a slim fan. This winter I will try this out and post results.

You D series guys have it easy as the TRF090 should work with just a EG compressor bracket and a slight bending of the lines (if at all, most of the adjustments to fitting angle could be accommodated by just flexing the rubber portion of the hose)