

Install a Skunk2 Intake Manifold On Your D-Series
(this is very rough right now, its mainly just showing wherehoses etc go)
So during my MPFI Swap i acquired a skunk2 intake manifold.
Below are the labeled locations of where everything plugs in etc.
Tools required/stuff required
10,12,14 mm sockets, wrenchs, speed wrenchs.
Intake manifold gasket
Throttle body gasket for the throttle body used.
*MAP Sensor gasket( if you use a new map sensor. if your tb has one already then dont worry)
go to autozone and pick up some "caps" for valves. they have a variety pack for 6$ that was all i needed
Coolant ( you loose some on the removal or old intake manifold)
Skunk manifold instructions are handy...you can get them via there website
Remove your stock intake manifold by following the helms guide or honda workshop manual. reinstall according to that. this is more or less focusing on where lines, vacuum hoses etc go. the install itself for the manifold is straight forward.
When you have both manifolds off switch the eacv over to the skunk2 manifold and switch the iat sensor over as well.Switch over your throttle body, fuel rail, injectors etc. do not lose any of the spacers etc.
basically take everything from the stock manifold and put it onto the skunk2 one.
once done with that
Remove and throw out your charcoal canister. buhhhh byeee
then
The stock map sensor that is mounted to the firewall, unbolt it and throw that crap out. in my case i was able to hook my map sensor to the spot on my throttle body with my new map sensor. make it go buhhhhh byeeee
before puttin on the intake manifold, take a minute to make sure you understand what goes where. its a tight fit and some wiggeling was required to get it to fit in.
![Image]()
![Image]()
![Image]()
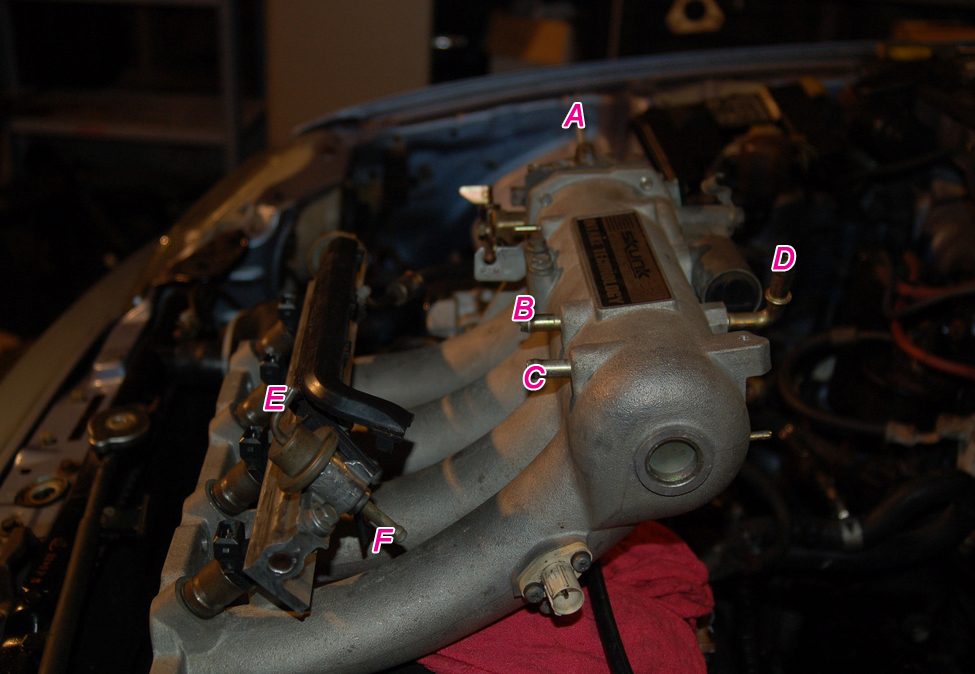
A - cap this off and throw out the charcoal canister etc.
B - This can go to E
C - Cap this off.
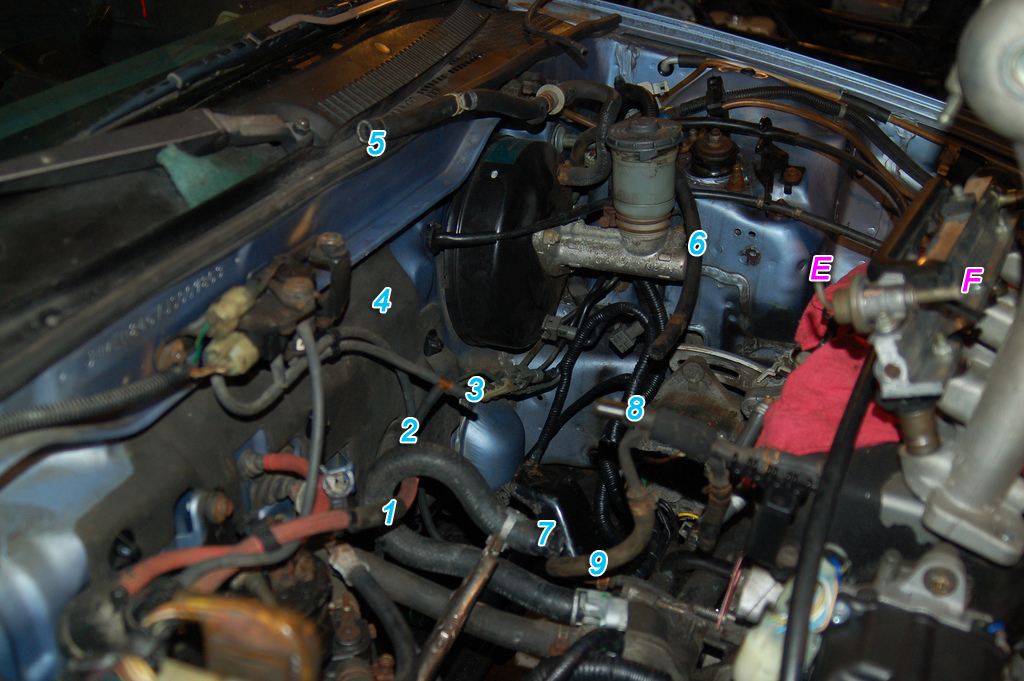
D - 5
E - B
F - 6
G - waterpipe or coolant line
H - L
I - DO NOT USE (this is used to prevent cold starts etc..mainley used in canada )
J - DO NOT USE (this is used to prevent cold starts etc..mainley used in canada )
K -7
L - TO H
** if you have 2 outlets on your water pipe on the back of the motor...just plug one off..i swapped mine out for a single outlet tube off of a d15b2. MAKE SURE YOU GET NEW ORINGS FOR THE WATER TUBE!!!...you can plug it by just using a small piece of hose..slip it on and clamp it down..then put a bolt in the other end and clamp that down so they are snug and no fluid will come out of the extra outlet**
This is information that i received from Downest who took time out his day and called me with an answer. thanks dude i appreciate it a ton. if i misinterperted it please let me know, i will be hooking everything up tonight and turning the car over for the first time in 8 months. im excited.
Numbers
1,2,3,4 got deleted. 8 and 9 were deleted also. the spot where 9 plugs into ( i believe thats a coolant line) goes into the eacv.
The stock map sensor that is mounted to the firewall, unbolt it and throw that crap out. in my case i was able to hook my map sensor to the spot on my throttle body with my new map sensor.
Everything else gets capped off or deleted.
Once you have actually got the intake installed etc, you need to mount the throttle cable. i had a 92-96 civic throttle cable bracket which i just bent to work. see my pic.
itll look like this after
![Image]()
Once the manifold is installed, start connecting the lines as the above diagram showed. Plug each plug into its respective spot. You may want to lengthen the stock map sensor wires, just becuase they are very tight and short. lengthen them about 1-2 feet and then you can run the wires low and up the back side.
follow reinstall procedure from honda.
available here
add some http:// to this ~> hondatech.info/downloads/Auto/Manuals/CRX/ - full manual download.
or here to search by sections
add some http:// to this extension ~> media.honda.co.uk/car/owner/media/manuals/CRXManual/
Pics of the aftermarket install...please let me know if anything seems outa place.
![Image]()
![Image]()
the line that isnt connected to anythingin this picture went to the water tube that runs behind the block...it had a spot for a hose to plug into..
THIS IS ALL THE STUFF I Took out
![Image]()
Video of it running..it was throwing a code 14 and 4 becuase of a wiring issue during the mpfi swap.
stock d15b2 with mpfi swap stock header and exhaust. no intake on it at this time.
(this is very rough right now, its mainly just showing wherehoses etc go)
So during my MPFI Swap i acquired a skunk2 intake manifold.
Below are the labeled locations of where everything plugs in etc.
Tools required/stuff required
10,12,14 mm sockets, wrenchs, speed wrenchs.
Intake manifold gasket
Throttle body gasket for the throttle body used.
*MAP Sensor gasket( if you use a new map sensor. if your tb has one already then dont worry)
go to autozone and pick up some "caps" for valves. they have a variety pack for 6$ that was all i needed
Coolant ( you loose some on the removal or old intake manifold)
Skunk manifold instructions are handy...you can get them via there website
Remove your stock intake manifold by following the helms guide or honda workshop manual. reinstall according to that. this is more or less focusing on where lines, vacuum hoses etc go. the install itself for the manifold is straight forward.
When you have both manifolds off switch the eacv over to the skunk2 manifold and switch the iat sensor over as well.Switch over your throttle body, fuel rail, injectors etc. do not lose any of the spacers etc.
basically take everything from the stock manifold and put it onto the skunk2 one.
once done with that
Remove and throw out your charcoal canister. buhhhh byeee
then
The stock map sensor that is mounted to the firewall, unbolt it and throw that crap out. in my case i was able to hook my map sensor to the spot on my throttle body with my new map sensor. make it go buhhhhh byeeee
before puttin on the intake manifold, take a minute to make sure you understand what goes where. its a tight fit and some wiggeling was required to get it to fit in.

A - cap this off and throw out the charcoal canister etc.
B - This can go to E
C - Cap this off.
D - 5
E - B
F - 6
G - waterpipe or coolant line
H - L
I - DO NOT USE (this is used to prevent cold starts etc..mainley used in canada )
J - DO NOT USE (this is used to prevent cold starts etc..mainley used in canada )
K -7
L - TO H
** if you have 2 outlets on your water pipe on the back of the motor...just plug one off..i swapped mine out for a single outlet tube off of a d15b2. MAKE SURE YOU GET NEW ORINGS FOR THE WATER TUBE!!!...you can plug it by just using a small piece of hose..slip it on and clamp it down..then put a bolt in the other end and clamp that down so they are snug and no fluid will come out of the extra outlet**
This is information that i received from Downest who took time out his day and called me with an answer. thanks dude i appreciate it a ton. if i misinterperted it please let me know, i will be hooking everything up tonight and turning the car over for the first time in 8 months. im excited.
Numbers
1,2,3,4 got deleted. 8 and 9 were deleted also. the spot where 9 plugs into ( i believe thats a coolant line) goes into the eacv.
The stock map sensor that is mounted to the firewall, unbolt it and throw that crap out. in my case i was able to hook my map sensor to the spot on my throttle body with my new map sensor.
Everything else gets capped off or deleted.
Once you have actually got the intake installed etc, you need to mount the throttle cable. i had a 92-96 civic throttle cable bracket which i just bent to work. see my pic.
itll look like this after

Once the manifold is installed, start connecting the lines as the above diagram showed. Plug each plug into its respective spot. You may want to lengthen the stock map sensor wires, just becuase they are very tight and short. lengthen them about 1-2 feet and then you can run the wires low and up the back side.
follow reinstall procedure from honda.
available here
add some http:// to this ~> hondatech.info/downloads/Auto/Manuals/CRX/ - full manual download.
or here to search by sections
add some http:// to this extension ~> media.honda.co.uk/car/owner/media/manuals/CRXManual/
Pics of the aftermarket install...please let me know if anything seems outa place.


the line that isnt connected to anythingin this picture went to the water tube that runs behind the block...it had a spot for a hose to plug into..
THIS IS ALL THE STUFF I Took out

Video of it running..it was throwing a code 14 and 4 becuase of a wiring issue during the mpfi swap.
stock d15b2 with mpfi swap stock header and exhaust. no intake on it at this time.
") b
b

